Saturday 14 January 2012

Ninite - Install/Update multiple programs at once

If you are an admin/power user then you probably have a USB drive with a load of nifty utilities to help troubleshoot/administer machines.  This is a great little tool for any such user as it allows you to "bulk install" all of the applications that you want in one go with no downloading and clicking through loads of installers.

Just browse to http://ninite.com/ and scroll down the page and you will see plenty of familiar useful applications.  Put a tick next to each one that you would like to take with you.

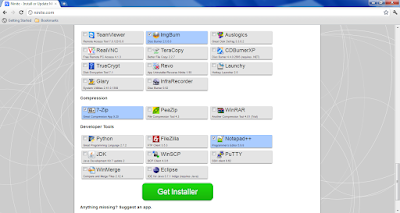
Screenshot above shows the installer customisation screen
Once you have selected all of the apps that you are going to want to install click on the "Get Installer" button and you will download your customised installer.  Once you locate the installer (usually named after all of the apps that you have chosen e.g. "Ninite 7Zip AVG Chrome Dropbox Flash Flash IE Installer.exe" (I would suggest renaming it) double click on the installer.  After a few moments the Ninite installer will begin to download and install/update all of the apps you selected.
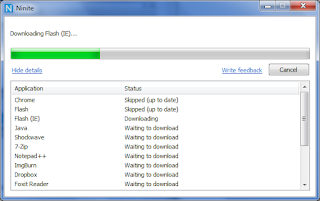
The Ninite installation screen - use Show/Hide details button to display the extra info
As simple as that.  I take this installer with me on a USB pen and use it to update machines with the latest Flash, Java, Google Chrome etc.  Once it has finished the window remains open to summarise the installations that Ninite has just performed:
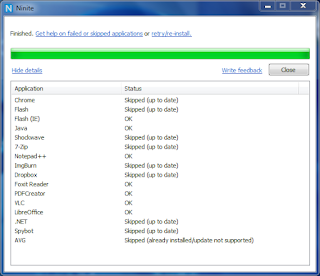
Ninite shows you applications that it has installed, skipped or failed
All of those installations occurred without me clicking on anything (apart from the Ninite installer).  It automatically says "no" to any extra add-ons that these programs try to bundle too (such as browser toolbars).

Friday 13 January 2012

Windows 7: Restore previous versions of files

This is a guide on how I think the "Restore Previous Versions" feature can best be utilised.  By default this feature is hardly usable in Windows 7 since restore points are only created when fairly major OS upgrade/installations take place.  Would you like to be able to restore a file to how it was yesterday?  How about this morning - even though your corporate backups only run nightly!?

This method will provide you with the ability to restore a file to a previous version on a laptop/desktop with your documents saved to your hard disk drive as opposed to a network share.

Configuration

Ensure that system restore points are turned on
    • Click Start
    • Right click on "Computer"
    • Select properties
    • Select "System Protection" from the right hand side bar (highlighted below)
The Computer Properties Window
    • Click on the configure button on the "System Properties" dialogue box
System Protection Options available in Windows 7
    • Ensure that either "Restore system settings and previous versions of files" or "Only restore previous versions of files" is selected
    • Use the "Max Usage" slider to select the maximum amount of space to set aside for the previous versions of your files. It should go without saying, the more space you assign the further back you will be able to retrieve the file from. Once all of the space you have set aside is used up any new backups are saved over old ones.
Now that you have confirmed that system restores are turned on we can schedule a task to save a restore point for your files.  I am going to set mine to run at 12 daily + each startup.  If you know that your company does nightly backups this will give you an extra "safety net" to restore to if you make a change during the morning - anything further back you can either use your previous versions or contact the IT department to restore your previous files.
    • Click Start
    • Using the Windows 7 search bar to find a program (Task Scheduler is also available in Administrative Tools)
    • Type Task Scheduler in the search box and click on the task scheduler program
    • The Task Scheduler Window
    • Once task scheduler is open you will need to drill down to Task Scheduler Library > Microsoft > Windows > SystemRestore
    • Double click on the task (highlighted at the top of the centre window) to bring up the SR Tasks window
    • Click on the Triggers Tab
The Edit Trigger Window
    • Double click on the daily trigger and set the time to start to 12:00:00 (or whenever you would prefer)
    • Click OK
    • Now we are going to set the conditions under which the task runs - by default this task is queued until the computer is idle and wont run at all if the computer is on battery power!
    • Click on the conditions tab and untick "Start the task only if the computer is idle for" and also "Start the task only if the computer is on AC power"
    • Click OK
    • Use the Run option on the right hand side to test the process works ok
Now you will get restore points for your files every time you start up your computer and a second point created at 12:00:00.  To restore a file to a previous version
  • Right click on the file
  • Select Properties
  • Click on the previous versions tab
Once a few restore points are made it is possible to revert back to them

  • Highlight one of the previous versions, at the point the Open, Copy and Restore Buttons become available
    • Open will simply open the document - be sure to save it somewhere if you need to keep it
    • Copy will prompt you for a new location/name for the file - this way you can keep both your changed and previous version of the document
    • Restore will simply overwrite the "current" document with the previous backup.  I would never use this option as you will not get a chance to see the contents prior to restoring and you could end up with a "dud" file that is no better than the one you just replaced.  Instead open the file and then save it or use the copy option.
  • Once the file is restored you can click ok on the dialogue box to close it
Thats it, this tool can really help if you have a shared computer/files and wont to protect yourself from accidental file alterations.

Thursday 12 January 2012

The beginning

Just set up this page on Blogger
I hope to have some handy guides and general tech/geek tidbits up soon.  You get 3 points if you know the name of the game pictured above.